How Fools Checkmate Works and How to Avoid It
Understand fools checkmate, usually called Fool's Mate: the two-move sequence, why White cannot escape, and pawn mistakes to review afterward.
- Checkmate Patterns
- King Safety
- Game Review
On this page
The fastest possible checkmate is known as Fool's Mate, which occurs in only two moves by each player. The sequence behind this record for the quickest checkmate is 1.f3 e5 2.g4 Qh4#. This is a game of four individual turns: Black’s queen delivers an immediate check on its second move.
White’s opening mistakes are necessary for this two-move mate. In general, such mistakes will deliver a similar pattern, but White can do it in three moves. What we need to understand, though, is why these mistakes lead to checkmate — what they expose about the position that allows the attack to proceed.
How Each Move Contributes to the Attack
Let’s start by tracing how each move contributes to the attack. On 1.f3, the white pawn opens the diagonal from e1 to h4 — one that’s available to the black queen. But by occupying f3 instead of allowing the g1 knight to develop normally, White exposes its king further to attacks along the same line. Black plays 1...e5, a strong central occupation that also opens the d8-h4 route for the black queen. With 2.g4, the g2 pawn is removed, freeing up the remaining obstruction along the e1-h4 diagonal. Now, the queen can take advantage of this opened diagonal with 2...Qh4#, attacking e1.
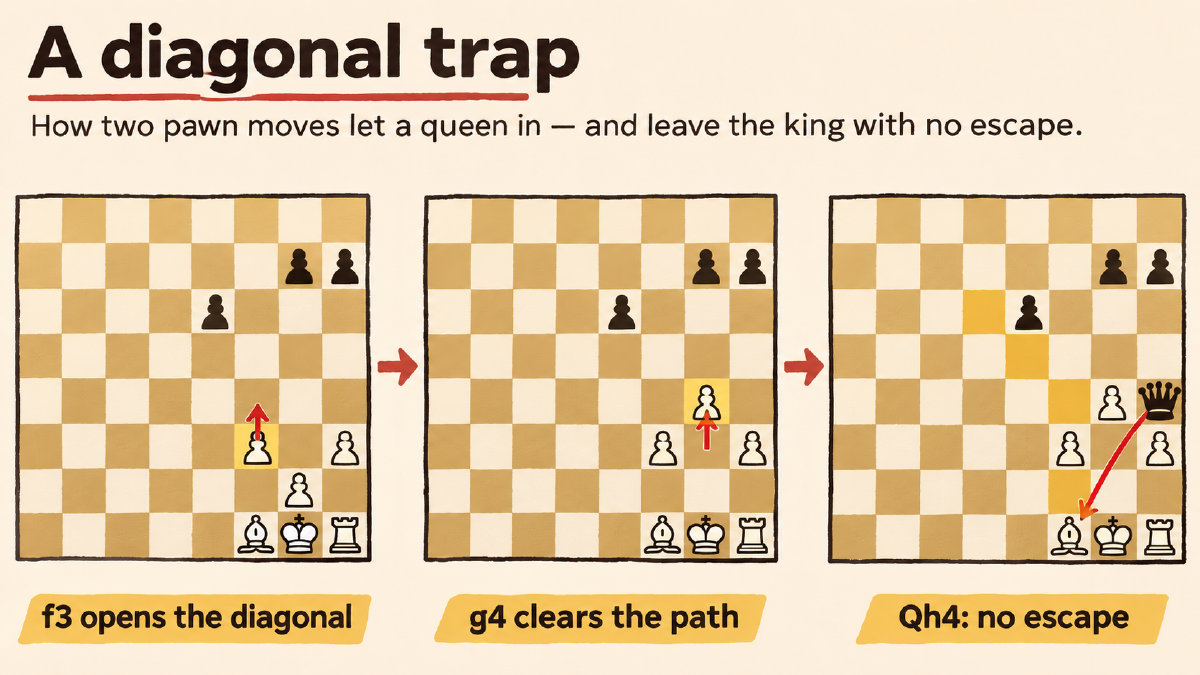
You may remember how to check for checkmate, but here’s a reminder: First, examine whether the checking piece can be captured without leaving the king in check. If no such possibility exists, then determine whether there’s a square where the king could move safely. Finally, check if there’s any piece that can block the checking line.
In this example, the checking line goes from h4 to g3 to f2 to e1. Can the queen be captured? No — the queen’s position doesn’t offer any squares where it can be captured without exposing the king further. There’s no legal white interposition either (g3 or f2), nor are there any other squares on the h4-g3-f2-e1 line where White could put the king. Meanwhile, d1, d2, e2 and f1 are occupied by White’s own pieces, blocking those escape squares! Furthermore, f2 is attacked by the queen; it’s a poor idea to leave the king there. If the king is checked, with no legal escape, it’s checkmate!
Black wins immediately after this, and the game ends. All the conditions of a checkmate are met, including the fact that the king has no escape squares and the queen cannot be captured.
The Decisive Pawn Mistake and Prevention
To see how the decisive pawn mistake connects to prevention, consider how the position looked at the end of each move. After 1.f3 e5, the king is exposed, and the queen is poised to take advantage of that. Then came 2.g4 — the decisive mistake, according to most chess teachers — which leaves the e1-h4 diagonal open. Now, the queen is ready to take advantage.
So how else could this have played out? Alternatives include developing the knight early, rather than advancing pawns in this fashion. A preferred teaching alternative would be 2.Nc3. Alternatively, 2.e4 would be more effective in delivering lasting safety, while 2.e3 would open the f1 bishop’s diagonal.
Alternatives prevent this particular sequence, yet they don’t necessarily stop the game dead in its tracks. Rather, White is just a little worse, and there is still the threat of checkmate if the opening play is not carefully maintained.
Opening Play and King Safety
Of course, playing f3 has drawbacks beyond the immediate threat of this mate. Not only does it expose another diagonal toward the king, it removes a useful square from the knight. In other positions, playing f3 might actually improve White’s chances.
While some positions guarantee king safety, others merely give White the best chance. Normal first-move alternatives are 1.e4, 1.d4, and 1.Nf3, with the last being particularly important. These allow for a balanced game, but not necessarily one that avoids checkmate completely. So it’s up to you to make the right choices in your opening play.
Scholar’s Mate
There’s another quick checkmate, called Scholar’s Mate, which is a different pattern possible after four moves. Here, Black’s queen delivers checkmate on f2 against White, or White’s queen delivers checkmate on f7 against Black, with the defending king still in the center. I’ve written extensively on Scholar’s Mate, so feel free to check out my existing guide on the subject for further information.
Sources
More in Chess Basics
- How the Queen Chess Piece Moves, Captures and Stays SafeLearn how the queen chess piece moves and captures, what its nine-point value means, and how to review queen-safety mistakes after a game.
- How to Use Chess Piece Points to Count Material and Compare TradesLearn chess piece points, count material after exchanges, and understand why activity, king safety and engine evaluations can outweigh the totals.
- How the Horse Chess Piece Moves, Jumps and CapturesThe horse chess piece is the knight. Learn its L-shaped moves, how jumping and captures work, and how to recognize a knight fork.